Chapter Two: Studio Gear
4. Mixing Consoles | Page 5
Master Sections 1
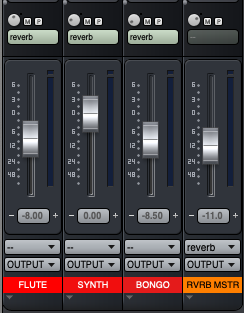
Effect/Aux Send Master Section

The aux send master section controls the total amount of signal being sent out to each of six aux devices, combining all the channel aux send amounts mentioned above for each individual aux send bus. It is possible to monitor one or more aux sends by pressing the solo button. Novice users often forget to turn up the aux send masters and consequently no signal is sent to the aux device.
This is a good place to mention the gain staging of an effects loop — that is, all the controls where the aux send signal may be boosted or cut. The process begins with the input channel strip aux send pots, which next go through the aux send master pot and into the effects box. The effects box likely has its own input level pot. These are often very sensitive, so sending the right amount of signal to avoid distortion is imperative.
Using Aux Masters for Effects Plug-ins in your DAW mix
Chances are you are not using external effects boxes anymore, but DAW plug-ins instead. Here is your chance to up your mixing game by creating and using aux masters for your common plug-ins. An example: most people, when starting out, will add a separate reverb plug-in for each input channel, even though the reverb may have the same setting for all. This makes it tedious to set the overall reverb level for the piece. Instead, create an aux send master channel that has one single reverb plug-in (in Digital Performer, this is accomplished by selecting Project→Add Track→Aux Track, add your reverb plug-in to this aux track, and then set the input of the new aux track to the aux send ba you plan to use as your reverb send). Route the input channel aux sends to the aux master channel you just created. Use the aux sends on the input channels to send as much or as little signal as desired from each to the reverb master. Then use the reverb master channel level to control the overall level of reverb.
For concerts, a DAW Aux Send Master setup is extremely handy when sending multiple channels to an on-stage monitor mix so the engineer can quickly adjust the monitor level with a single fader rather than having to adjust each input channel send separately.
The Monitor Section
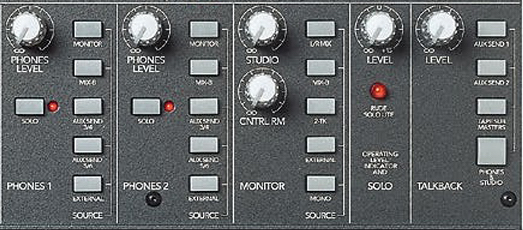
The monitor section may control what signals and levels are sent to the studio speakers (if stereo), the control room speakers, the talkback circuit (for communicating with artists or thieves in the studio, or conductors on-stage), and headphones. This depends on how the board has been configured by the studio overseers, as many studios, particularly multi-track studio, have speakers connected directly from the main output faders and bypass this section. Use the source buttons to select the source that you are monitoring. If your stereo studio IS wired from the studio or control room output, the L/R Mix will send to speakers off the main stereo fader. This is one of the first things you should check if you get no sound out of the board. In addition, the master level and indicator for the solo bus is set in this section.
If you are recording a performer and wish to send only certain channels at various levels into their headphones, choosing the source bus is done here. For example, you may select Aux Send 3/4 to send to the headphones and then adjust the sends on only those input channels to send the material to the solo master bus and ultimately to the phones.
If your studio uses the control room pot to feed the control room speakers, it is important to realize that the level of signal emanating from the control room speakers IS NOT necessarily the level of signal being sent out the board and recorded, or sent into the concert hall if you are doing playback from a control room. That is controlled by the output section (see next page). Watch the output meters for levels actually being sent to recording devices.
